

Random tricks of the trade that you may never use – but will save you hours that one time you need them.
Yes, there are other editor hacks out there but we’ve pulled all the ones that can save you some series stress. And when we last searched in Google, most of the top articles were from a few years ago way back before some of these functions even existed. We’ve trawled our team of Editor super users to pick out some of the best tactics for anyone who spends time using AdWords Editor.
Revert
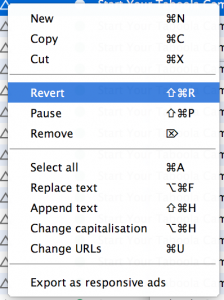 This is how you undo all changes and go back to the settings that you download. It wipes the slate clean. If you know this one move on but it really isn’t as obvious as it should be. I wish I’d known this one from day one, seeing as you can accidentally and unknowingly make a small change that makes

a huge difference to thousands of ads just by touching the wrong key. So going back to square one is sometimes the safest option. Especially if you are knew to editor. You can right click and “revert” an item (e.g. ad or keyword) or you can select a larger entity like a campaign and “revert with all included items” to clean up after yourself en masse.
Filter to show: “All unposted changes”
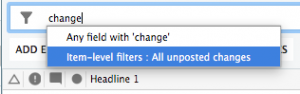 Think you’ve made a mistake? All it takes is touching the wrong key when you’ve had thousands of ads selected to really throw a spanner in the works. If in doubt, filter to show just ads that have been changed (but not posted yet) and you can see if you’ve done any real damage. Then you can put those revert skills to use wherever needed.
Filter with functions
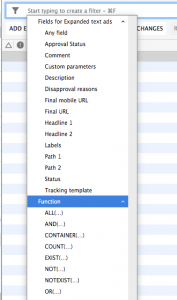 This is a fairly new one but really useful. You can now filter one level (e.g. ad groups) according to a value at a different level (e.g. number of ads). Very handy if you want to find any ad groups that have fewer than 3 ads or perhaps ad groups that don’t have a keyword or even when you want to create a filter where “all” of your criteria are met. The full list of functions can be found here.
Launching ads in bulk – start with keywords
If you’re setting up new campaigns, then you normally have to go and add each “entity” separately. First you build the ad groups, then ad the keywords, then the ads. This doesn’t take long if you’ve built the perfect spreadsheet for these. But we can still save valuable seconds. You just need to copy and paste from your template spreadsheet with columns for: campaign, ad group, keywords, match type, headline 1, headline 2, description, final url. Copy all your data but paste in ad the Keyword level. This will build the ad groups and campaign for you.
Launch new ads in bulk – put the same ads everywhere
This is a super fast way to flesh out a campaign that needs new ads where you want to use the same 3 ads per ad group. This won’t bring in the best Quality Score ever, but sometimes you simply don’t have time to create a unique ad copy for each keyword, or perhaps you’ve just had a few generic ads translated into a language you don’t speak and you have to work with what you have. If you select a campaign and then paste 3 ads that you have copied, you have the option to instantly place all 3 ads in every single ad group within the campaign. Also useful for things like age adjustments which have to be added at ad group level. Or you can paste at account level and send your location targets, negative keywords or anything else into every campaign/ad group at once.
Copy and paste everything
This is not to be underestimated. From copying and pasting all targeting items in a campaign (how long would it take to set these up in the interface?) to adding bid adjustments at every level and setting up audiences. You can copy the “shell” of a campaign to create a new empty campaign with your default settings. Or you can copy an entire campaign – then just add an audience to instantly create a dedicated remarketing campaign in seconds. You can copy pretty much anything you can manage.
Take a shortcut
Clicking is for noobs. OK, you may never need most of these and I’m sure you know copy and paste but you’d surprised how handy some of these are if you spend all day in editor. Which I do. Because it’s awesome. My favourite is revert. Check out the full list of shortcuts for Windows and Mac.
Adjust bids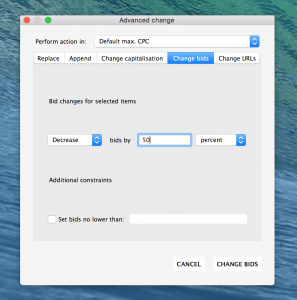
You can do this in the interface too “reduce bids by X%” or “increase by Y dollars” but you may want to do this in editor as it is handy when creating new campaigns – e.g. increase by 20%
across the board for a RMKT campaign. Not useful very often but if you already have a relatively optimised campaign (i.e. slightly different bids for all ad groups) it’s a super fast way to make a big change.
Download audiences to import to a new account
If you are launching campaigns in a new account (e.g. you are launching in a new country) then you may have noticed you cannot copy and paste audiences from one account to another even though you went to all the trouble of adding them at MCC level, purely so you can use them in multiple accounts. This can be a pain. But if you do have audiences set up at MCC level then you can “export” from the original campaign and then “import” rather than copying and pasting to set up the new campaigns. This saves the tedious selection of multiple audiences (and negative audiences) at each ad group/campaign level.
Nail down targeting settings
Whenever you setup a campaign that is targeting an audience you will often find that by default your ads are being shown to people outside your audience. This is because Google wants to show your ads to as many people as possible. This way you will spend more money. While there are advantages to reaching more people, we always prefer to reach different people in different way. You can do these things in the interface but you can also set this up form the start in Editor (where they are not easy to find). To stop your campaigns reaching beyond your audiences this you need to do a few things:
- Change the “interests and remarketing” settings under “flexible reach” you can find this at both campaign and ad group level. You want to select “Targeting” which means your ads get shown exlcusively to your audience. If you leave the default “Observations” your ads will be shown to your audience, but also tons of other people too.
- Check campaign level targeting settings as these overrule ad groups settings! Be careful of this. It’s one of the few times where “more granular” does not get more priority.
- Set “Targeting optimisation” to “Disabled” at Ad Group level. Again, this is how Google show’s your ads to people outside your audience.
Find and replace ad copy – create duplicates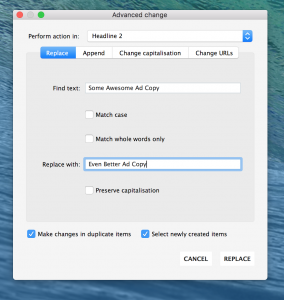
Find and replace is your friend. One sneaky little option that only pops up when playing around with ads is the “create duplicates” option. This is especially useful if you want to create new variations of existing ads and run them side by side – perhaps to test ad copy, or just leave the old ads alone so you have the historic data saved separately from your newer, better ad copy. Or if you’ve started off by pasting a single ad into each ad group, you can almost instantly create new variations by finding and replacing one of the headlines – do the same again and suddenly you have 3 ads per ad group. This is even faster than duplicating ads in a spreadsheet or copying and pasting ads in some cases.
Create custom rules
You can create rules to display the annoying little orange triangle alerts – or even block yourself from uploading ads if they meet a certain criteria. Not sure how useful this is but might be worth playing with if you work in a sector with strict compliance or if you have specific brand guidelines.
Make use of labels
It can take hours to download performance metrics for all ads in editor. Instead, create a filter and set labels in the interface, then just “get recent changes” and you can quickly make changes to ads according to performance metrics using labels as a proxy. Despite the new interface being allegedly “faster” we’ve found making changes to large numbers of ad groups at once isn’t smooth as in the older interface.
Acquire a conch shell
Like in lord of the flies, things get crazy if everyone tries to have their say at once. Be super careful if more than one person EVER works on the account. If someone else hasn’t downloaded changes since you posted yours, any work you’ve uploaded could be undone when they post their changes. This could be disastrous in cases where a campaign budget or targeting setting is changed as these things could easily slip under the radar. At least until some serious damage is done. A foolproof tactic is that only the person with conch shell, or dunce hat, or other unique physical item of your choosing is allowed to make changes. Make sure you acquire said item from your colleague before you start making changes and undo all their work seconds after they post it.
Think we’ve missed something essential? Hit us up on Twitter.